A Pie Guide
How to Make Beautiful Pies Without Any Baking Skills
Fake it ‘til you make it! I like to play around with this phrase. Not because I believe you should be around faking who you are, but I definitely think you should never stop yourself from doing something that you love just because you think its not accessible to you. Everything has a way around; you just need to find the way that works best for you.
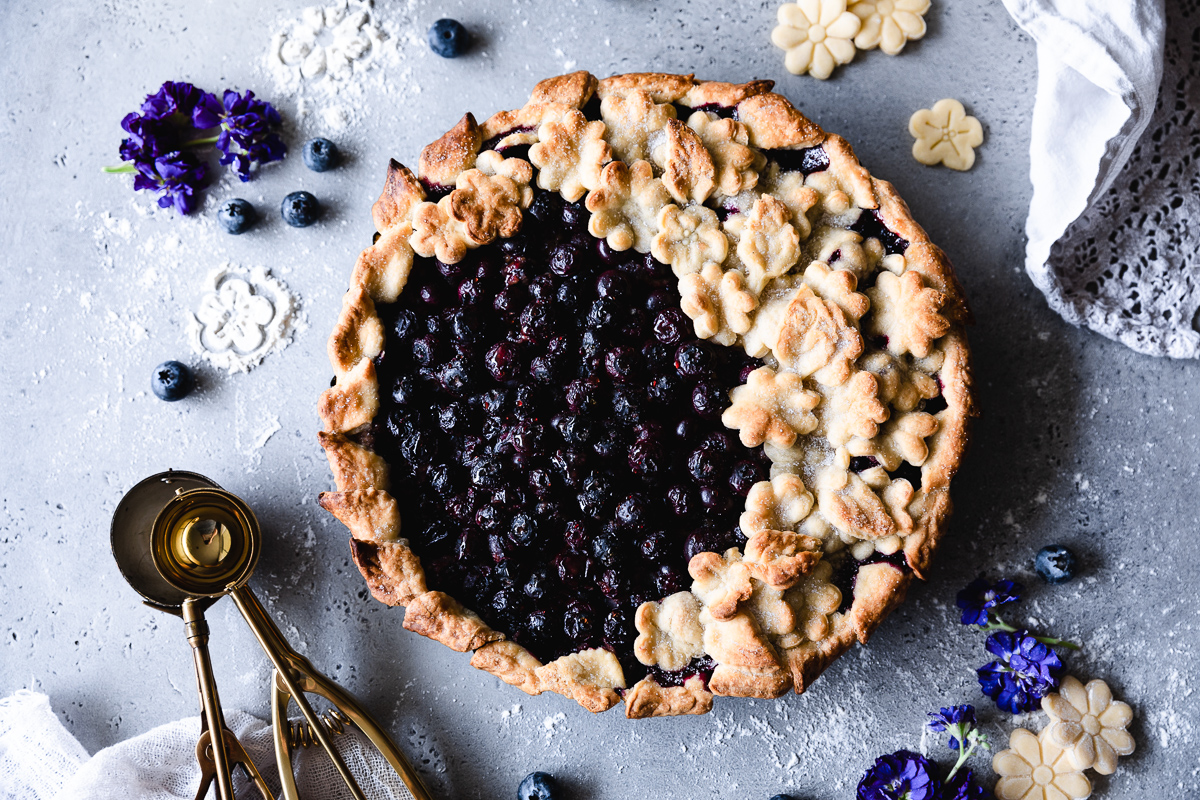
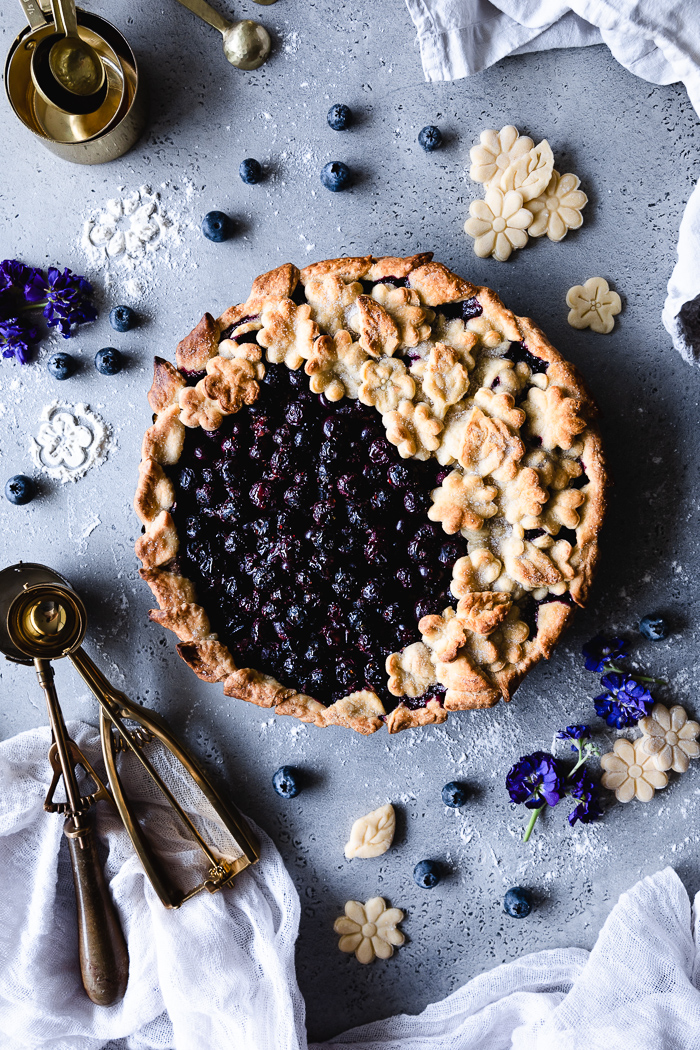
You probably have read this on some previous posts, but I have never been a crafty person. Neither have I been super creative in terms of art or design. I just appreciate beauty in its different forms and always try to make room for it in anything I do. And that of course includes baking. That’s why I’m always thinking on witty ways to make beautiful baked creations (and any dish creation for that matter) using some tools and tricks. I got in my hand some fantastic gadgets to make this beautiful pie, which I made it blueberry but you can make any filling you want.
The process was so soothing and relaxing! It was like taking some hours to myself to so something fun and craftsy. But the real motivation was that this was art we were actually going to eat!
One of those tricks is to use a flute pan. With this type of pan you leave out the step of crimping or having to make a design on the border of the pie. It’s the kind of thing seems super easy on video but for some reason never ends quite right when you do it yourself (cat eyeliner, I’m looking at you!). Another trick, the main one of this post, is using pie crust cutters or stamp cookie cutters. You can use a regular cookie cutter as well, but with these pretty stamps you will end up indenting the dough with a pretty design, not just giving it a shape. The ones I used here are from Williams Sonoma (not sponsored by the way!!) but there are other options in sites like Amazon as well. You will find them as cookie stamps cutters, pie crust cutters or fondant stamps. The important thing is that you see that you can actually cut dough with the utensil, not just punch and stamp.
So, I want to walk you through my process of making this blueberry pie so you can see how simple it is. It’s pretty comprehensive because I want you to SUCCED. But trust me, it’s really AS EASY AS PIE!

For making the bottom crust:
1. It’s important that you have a good and trusted recipe on hand. A well developed recipe will prevent shrinkage during the baking process, which is key to keep your decorations intact and recognizable. As you can see in my pie after baked, you can appreciate most of the details of the flowers and leaves and they are pretty much in its starting place. If you have a trusted recipe of course you can use that one. I’m leaving you mine below if you want to give it a try. My recipe yields two disks of dough, enough for two crusts or a bottom crust plus decorations.
2. When I’m ready to roll out the dough, I take it out of the fridge and wait a few minutes until it starts to get soft and manageable before working it.
3. I start by pounding the disk on top of a clean-floured flat surface. When it is quite flat I start rolling, always starting form the center out, rolling towards different points to stretch the dough in a circular shape. Always roll dough in one direction, not back and forth.
4. After a couple of stretches I will turn the dough about ¼° to prevent it from sticking on the surface. I even dust a bit more flour beneath the lifted dough area if needed.
5. When I get my desired disk size, I roll the dough into my rolling pin and then roll it out on my flute pan. I set it inside the pan, making sure the dough is in place through all the corners of the pan. Now, using the rolling pin, I roll through the top of the pan to cut out any dough excess. Place in the fridge.
6. Prick the dough through the whole surface without perforating it, this helps the steam to get release and prevent the dough from puffing.
7. I like to save the scrapes to have more dough for the decorations that will be on top. You just need to form a disk with the scrapes and chill in the fridge again until ready to make the cutouts. You will need to stretch again and create a circle to cut your decorations. This time though, the dough won’t be as elastic, not good if you want to make a large crust but good enough for small decorations.
For making the decorations for the top:
1. Repeat the process of pounding and stretching the second disk on top of a clean-floured surface.
2. Have a small bowl with extra flour around and a couple of pieces of parchment (or wax) paper.
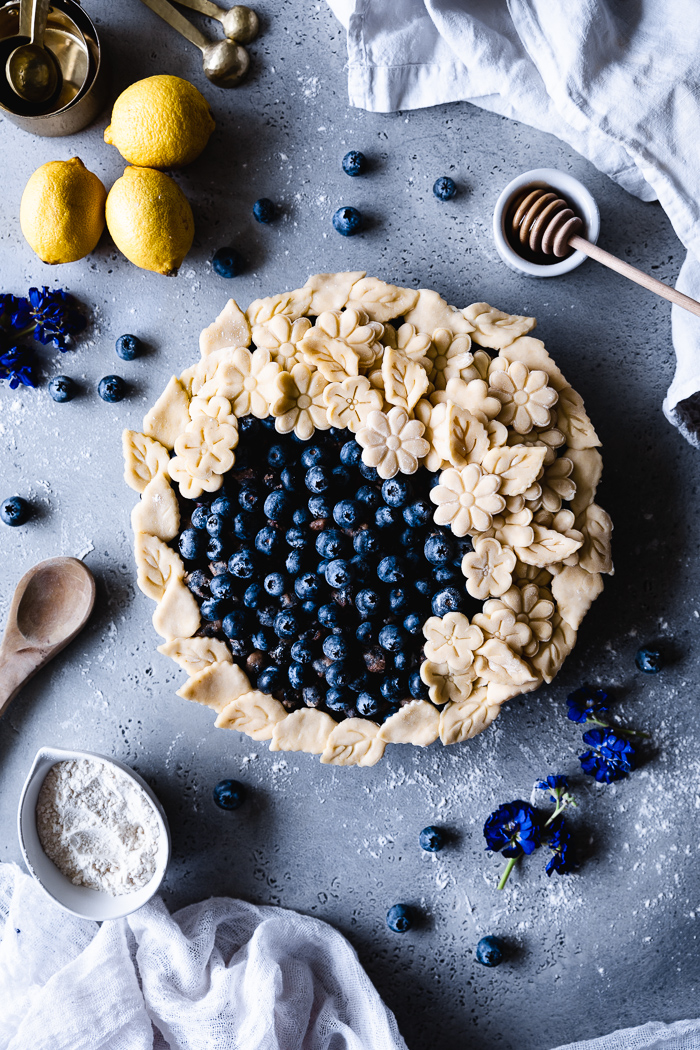
3. Decide your design to cover the whole top edge of the pan so you cut more of it. It should be something not too big or wide so it sticks to the pan. You can alternate designs if you want. I used just leaves because I wanted to concentrate the flowers on the center. I did alternate the orientation though to give them some movement. You can play with your design to create some movement too!
4. Do not cut and stamp at the same time. Start by pushing down the cutter at the edge of the dough without shaking it. Then press down the cutter handle to stamp the dough. Hold there and pull up the cutter. Then, over the parchment paper press again to release the piece of dough. Try to not touch the cutouts so they don’t loose their form. As soon as one piece of parchment paper is full place it on the fridge.
5. The idea of starting on the edge of the dough is because, in case the dough doesn’t stick to the cutter when you press down to stamp, you can break the thin border and take the piece out without dragging it too far. Another option is to punch again the dough with the pie cutter and try to stick the piece of decoration onto the cutter. Make sure there are no pieces of dough inside the cutter after each cut. You may use a toothpick to take out any remaining.
6. If the dough is getting sticky you may lift the area that you are about to cut and dust some flour beneath, as you did while working the first disk. Remember that floured hands, utensils and surface always help when working with dough.
7. You can knead the scrapes and stretch again to have more dough for more decorations, as you did with the remaining dough of the bottom crust. Each time you stretch it though, the circle would be less elastic and of course, smaller.
8. To create the top, start with a few large cutouts as the base. Then start building up by alternating and intercalating cutouts until you have the design you want. Have fun mix and matching to create your story! I like to create a semi circle with the larger pieces on the center and some smaller pieces towards the end, as if the arch is getting thinner. Then, build up on the wider area. I used here three designs: the leaves, a large flower and a smaller flower. You can see in the pictures how I gave some of the flowers their own leaves, as if you are looking at a loose bouquet.
9. Place all the decorations on the fridge to let the dough harden.
To create and bake the pie:
1. Make your filling and fill your pie. (Remember, if your particular recipe calls for blind baking the bottom crust, do it before you fill your pie. Then continue with the process.)
2. Start covering the border of the pan with the cutouts. Press them towards the dough on the edges so they don't fall out while baking. Fill the pie and then create your top decorations. This time place the whole pie in the freezer for 20 to 30 minutes.
*Freezing is key to prevent shrinkage.
3. While the pie is in the freezer (or since you start heating your oven), place a baking tray on the oven so it gets very hot. When ready to bake the pie, carefully place it over that hot tray and bake the pie on it. This will help the bottom crust from getting soggy.
4. In the meantime prepare your wash (I used almond milk with a bit of vegetable oil but you can use a mix of a beaten egg with water as well) and preheat the oven.
5. Right before baking, cover the border of the pie with aluminum foil to prevent it from getting darker too fast. To make this, cut about 4 pieces of 6”of aluminum paper and folded each in half. Spray a side with baking spray and use them as mini tents to cover the edge of the pie. Try to bring each piece close enough to the dough but trying not to touch it so it doesn’t stick to the foil.
4. Bake your pie according to recipe.
5. If blind baking, you will need to put in the freezer the bottom crust, blind bake according to recipe and then finish assembling your pie. Place in the freezer again to set the top of the dough before finish baking.
VOILÀ!!!!
Make in advance: You can make the dough and leave the flattened disks on the fridge overnight. This is how I do it most of the time and its even better for the dough. Alternatively, you can ensemble the pie crust on the pan, cut your decorations and prepare the filling in a bowl the day before. The next day just ensemble the whole pie and place it in the freezer for about 20 minutes before baking. The dough will be good in the fridge for almost a week, so technically you can start on working on you pie that far.
I hope all these steps help you make a pie that not only is delicious but a beautiful centerpiece for your holidays as well!!! Leave me your questions in the comments section and I’ll help you get that beautiful pie DONE!
The Prettiest Pie
Pie Crust
(Enough for two 10” crust)
Full fat organic coconut milk, or milk of choice - ⅓ cup
(If the coconut milk is separated just mix it well and chill it for several minutes. Also, avoid using milk that you can see the oil separated from the water)
White or apple cider vinegar - 2 Tsp (UPDATED)
Unbleached all-purpose flour – 3 cups
Raw sugar – 4 TBSP + 2 TBSP to sprinkle on top before baking
Fine sea salt – 2 Tsp
Unsalted butter, chilled and cut in approximately 1” X ½” (you just need to cut about the size of a tablespoon and then in half) – 2 sticks
Iced water – ⅓ cup
Blueberry filling
Fresh blueberries – 5 cups
Raw sugar – ¼ cup
Brown sugar – ¼ cup, tightly packed (if you don’t have brown sugar use your raw sugar instead for total of ½ cup)
Fine sea salt – ¼ Tsp
Freshly squeezed lemon juice – 1 TBSP
Unbleached organic all purpose flour – ½ cup
A beaten egg with a bit of water or some milk with a bit of oil for the wash.
Total time - 3 hours besides overnight time for chilling on the fridge or 5 hours Active time - 2 to 3 hours
Equipment - Food processor, rolling pin, 10" flute pan, pie crust cutters or stamp cookie cutters, parchment paper, pastry brush
To make the pie crust: Dust some flour on a clean surface near the area you will be working.
Mix coconut milk and vinegar together.
Place the flour, sugar and salt in the bowl of a food processor already attached to its base. Pulse a couple of times to integrate everything. Add the pieces of butter and pulse for less than 30 seconds, until the butter incorporates into the flour. You should see or feel chunks of butter. Slowly pour the coconut milk through the lid hole with the food processor running. Continue pulsing for 15 seconds more. Start drizzling the water and keep running the processor just until a big ball starts forming. After that pulse a few seconds more, you should see practically all the flour pressed onto that ball. Take out the dough from the food processor and dump it on the floured surface. If the dough it’s too tacky that it’s barely holding its shape, dust it with some extra flour and gently press the dough to incorporate everything. Divide the dough in two halves. Kneed just enough to shape a circle and flatten each out to form a flat disk of 6 to 7 inches approximately. It’s important that the disks are flat and have a nice circular shape. Wrap each disk with plastic paper and place them in the fridge for at least 1 hour.
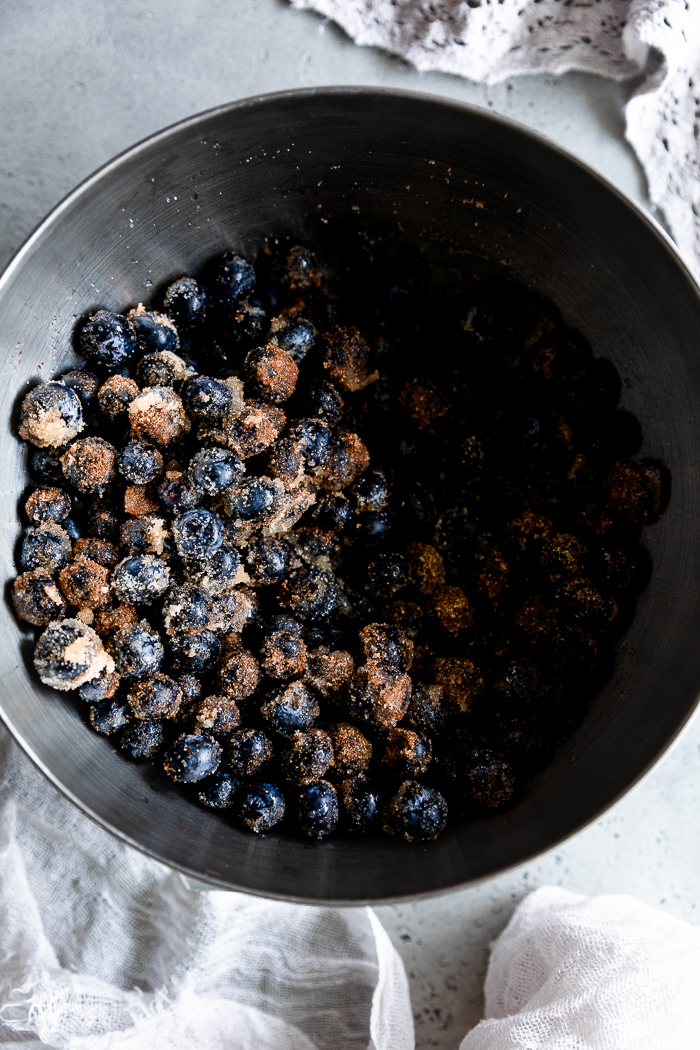
To make the filling: In a large bowl combine the fruits with the sugars, salt and the lemon juice, until everything seems well integrated and there are no big lumps of sugar. Add the flour and mix again well, until the flour has mixed with the other ingredients. Small lumps of flour are ok. Set aside.
To assemble the pie: Take 1 of the disks out of the fridge and let it soften until it starts to feel manageable. Place it on a clean-floured surface. Dust your hands and rolling pin with flour. Using your rolling pin, start pounding the disk from the center out until you have flatten most of it. Now start stretching the disk, (again, always from the center out and always in one direction, never back and forth) until you have an ⅛” thick circle that is about 1” larger than your pie pan. Remember to keep dusting flour on your rolling pin when the dough it’s getting sticky and to turn the disk and dust some flour beneath it every now and then to prevent sticking on the bottom (see notes on making the crust).
Roll the dough into your rolling pin and transfer over you pie dish, carefully arranging it on the center. Gently, start pressing the dough in the center of the dish until you reach the edge. If you feel air beneath the dough on the edge just pull up the border and let it kind of sink into the dish, helping with your fingers. Press the dough on the border against the dish. Using the rolling pin, roll over the pan to cut out the hanging dough. Using a fork gently prick through the bottom surface, making sure you don’t pierce thru the dough. Place in the fridge for chilling.
Repeat the process of stretching with the other disk of dough. This time roll it just a tad thicker than the ⅛” so the decorations hold. Cut out your decorations and place them in the fridge as well for about 20 minutes (see notes on how to make decorations).
Preheat oven to 400°. Place oven rack in the oven’s third tier, second from the bottom up.
In the meantime, prepare your filling, prepare your wash and prepare the aluminum foil pieces to cover the pie.
Take out your bottom crust and fill it. Using your decorations create the top crust for the pie (see notes above). Place everything in the freezer for 20 to 30 minutes.
*Again, freezing is key in preventing shrinkage!!
Take the raw pie out of the freezer and brush it with your wash, taking care of not breaking your decoration on top. Sprinkle the remaining 2 tablespoons of sugar on top of everything. Cover the pie with aluminum foil, taking care the paper its not touching the decorations but making sure there’s not much space between the pie and the paper.
Bake for 25 minutes. Take out of the oven and carefully remove the aluminum foil because there could be dough from the top stuck to it. Place in oven again and bake for an extra 15 to 20 minutes, until the filling is bubbling and the top is golden brown and with a few burned spots. *Bonus points if on the second round you sprinkle the oven with water using a spritzer to create moist. Not necessary but it helps in creating that golden brown crust and bubbly filling. If your pie is not browning, move it to the center of the oven for the last 10 to 15 minutes.
Take out of the oven and let it cool down before serving with whipped cream or ice cream! Or both of course!! : )