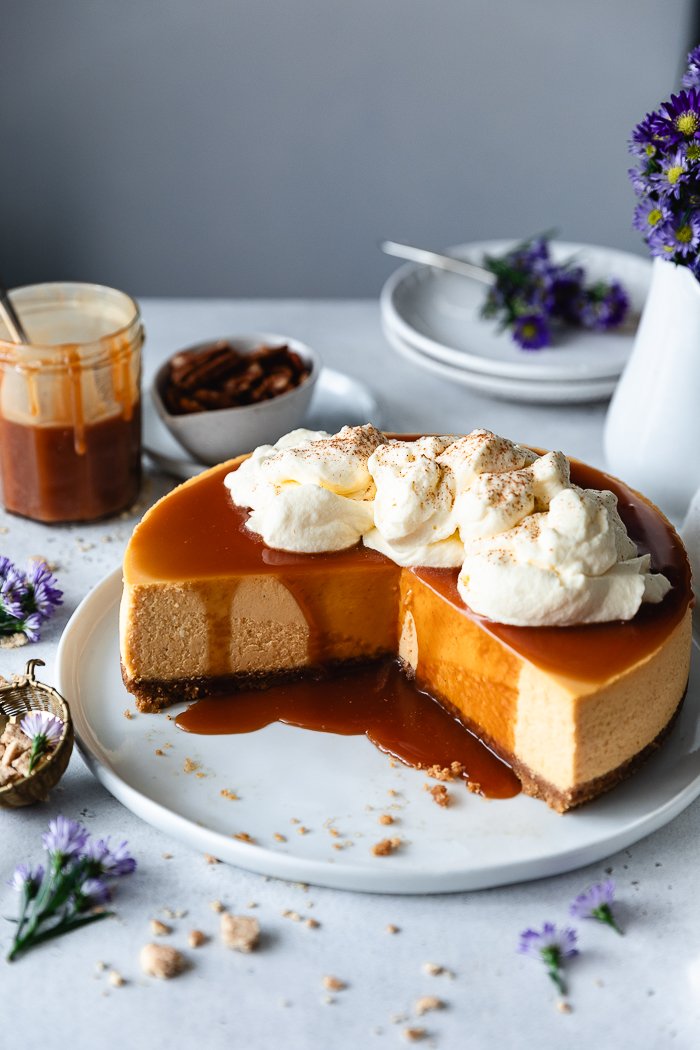
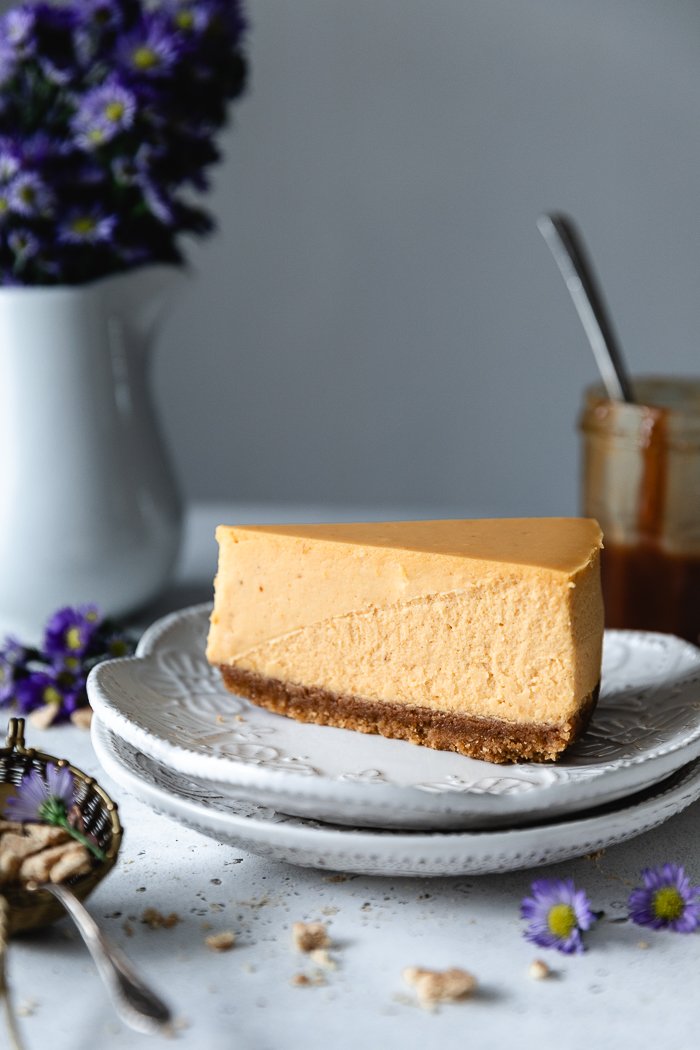
Creamy Pumpkin Cheesecake with Salted Caramel and Brown Butter Pecan Crust


(This post may contain affiliate links at no extra cost to you. This is my way to keep this site afloat and free of ads. Read my full disclosure here.)
You won’t find a pumpkin cheesecake as creamy, silky, decadent and with an amazing balance of flavors as this one! Every bite is pure bliss. Did I mentioned this is the creamiest pumpkin cheesecake? Just making sure you know! Everyone around you will be raving over this cheesecake!
You may be thinking, what makes this pumpkin cheesecake so special, among the zillion other pumpkin cheesecakes out there?
Well, for starters, this cheesecake calls for 5 boxes of cream cheese, 5 eggs and 2 extra yolks, and I’m not even flinching here. It has a full cup of pumpkin purée and I wanted the pumpkin to shine and not to be masked with other flavors. That’s why I used some brown sugar and a pinch of nutmeg, these two together pushed upfront the pumpkin flavor pretty nicely. A bit of lemon juice and coconut milk are always staples in all my cheesecake recipes. The lemon juice brings out the tartness of the cream cheese and the fat from the coconut milk makes it creamier like no other. And the brown butter crust adds so much warmness to the every bite!
You need more? Well, another amazing thing about this recipe is that it can be made even 4 days in advance. I actually recommend it! The texture gets creamier and creamier with the overtime chilling. The sweetness of the sugar tones down, leaving the spotlight to the warm flavors of the pumpkin, the bit of nutmeg and the molasses notes from the brown sugar.
Now, don’t panic if you are discovering this recipe and you need the cheesecake for tomorrow. It’ll be amazingly delicious as well!
What I’m saying is that if you can plan beforehand, and want dessert out of your list during the Thanksgiving week, go ahead and make it on Sunday. After it has completely cooled down, cover it tightly with plastic paper not touching the cheesecake and place it on the fridge until ready to serve. Cheesecake always taste better cold!
The caramel can be done way beforehand as well, it will actually stay good for months in the fridge. Store it in a glass airtight container (this is when old marmalade jars can finally see the light) and reheat in the microwave just to make it pourable.
3 keys to prevent a cheesecake from getting cracked, deflated or burnt spots
Room temperature ingredients is key!! Do not underestimate the importance of this.
Incorporate the less possible amount of air to the cheesecake batter. That why I mix in the slowest speeds and as little as possible. That’s why you need room temperature, kind of bit warm ingredients. They’ll incorporate faster so you don't have to over mix.
Always bake your cheesecake in a “bain-marie” if you prefer silkier and creamier cheesecakes.
My notes for making this Pumpkin Cheesecake
Start by taking out the cream cheese from the fridge, because point #1 from earlier. When they are already a bit soft, use a table knife to flatten them out, about half as high, so they get softer faster. If you need a shortcut, warm them in the microwave only for 10 seconds at the beginning. You don’t want separated cream cheese in your cheesecake batter.
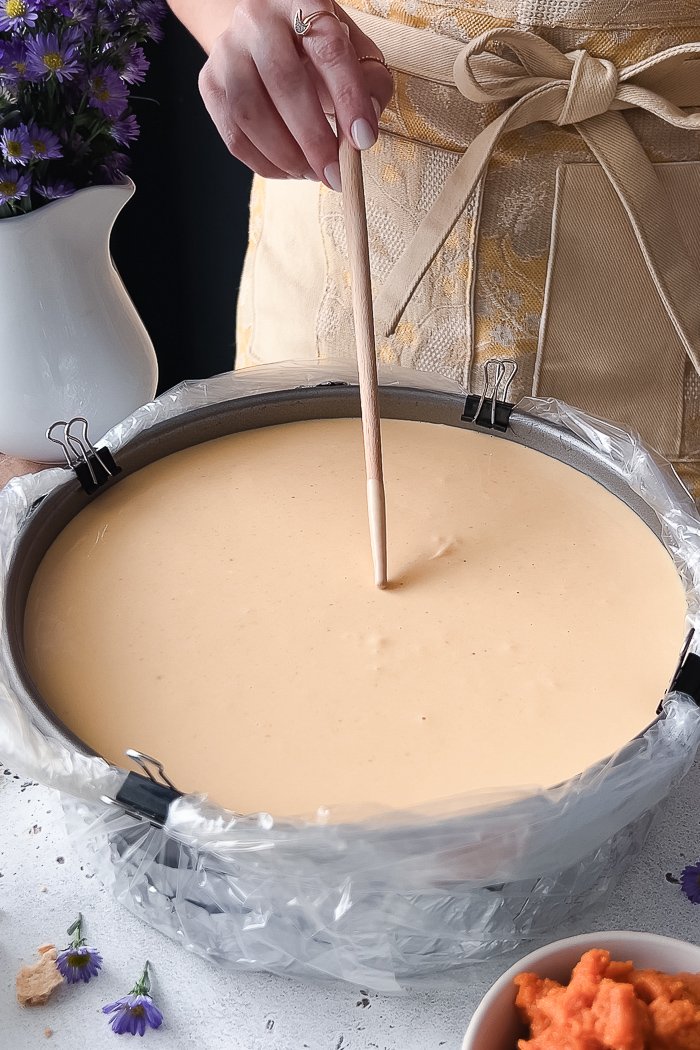
Prepare the springform pan. I learned this tip about wrapping the cheesecake with an oven turkey bag for baking, which I think is so clever!! I still wrapped it tightly with aluminum foil but then placed it inside the turkey bag. I used metal clips to secure the bag around the edges. It worked like a charm!! No water ran into the crust. You can make this after baking the crust as well. Just make sure the pan is not hot.
Make the brown butter.
Toast the pecans if using. Adding pecans is optional but they added a nice texture and nuttiest to the crust that contrasted beautifully with the creamy cheesecake.
Bake the crust accordingly to the recipe below nd remember to increase oven temperature to 425° when you take the crust out and fill the baking sheet with water a bit ore than half.
While the crust is being baked and cooled down, gather the rest of the cheesecake ingredients. Store egg whites in a freezer plastic bag and freeze them. They will be good for months.
Make the cheesecake batter, remember to not over mix through any of the steps and keep scraping the wall and bottom of the bowl to incorporate any large lumps of cheese.
Bake for exactly 7 minutes and then decrease oven temperature to 275°. Baking cheesecakes at a lower temperature is key to getting that silky and creamy texture we all love. The cheesecake is done when the border looks set and glossy and the center is a bit wobbly.
To prevent cracking, let the cheesecake start the cooling down process inside the oven by letting it in with the door open. After 20 minutes you can take it out to let it cool down completely.
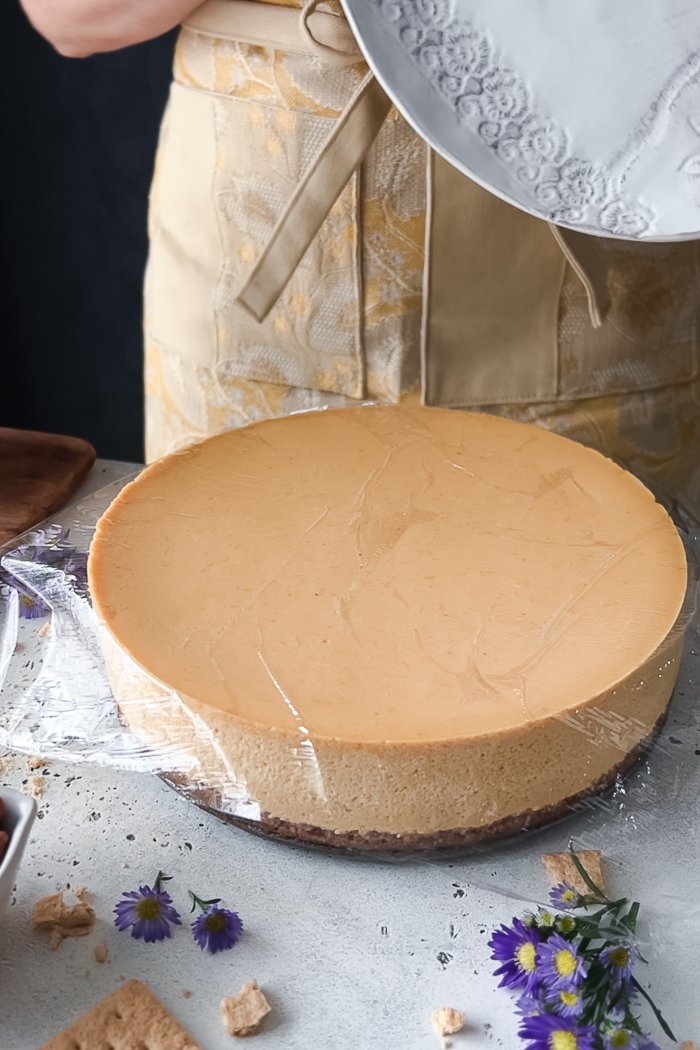
Cover your cheesecake tightly for chilling.
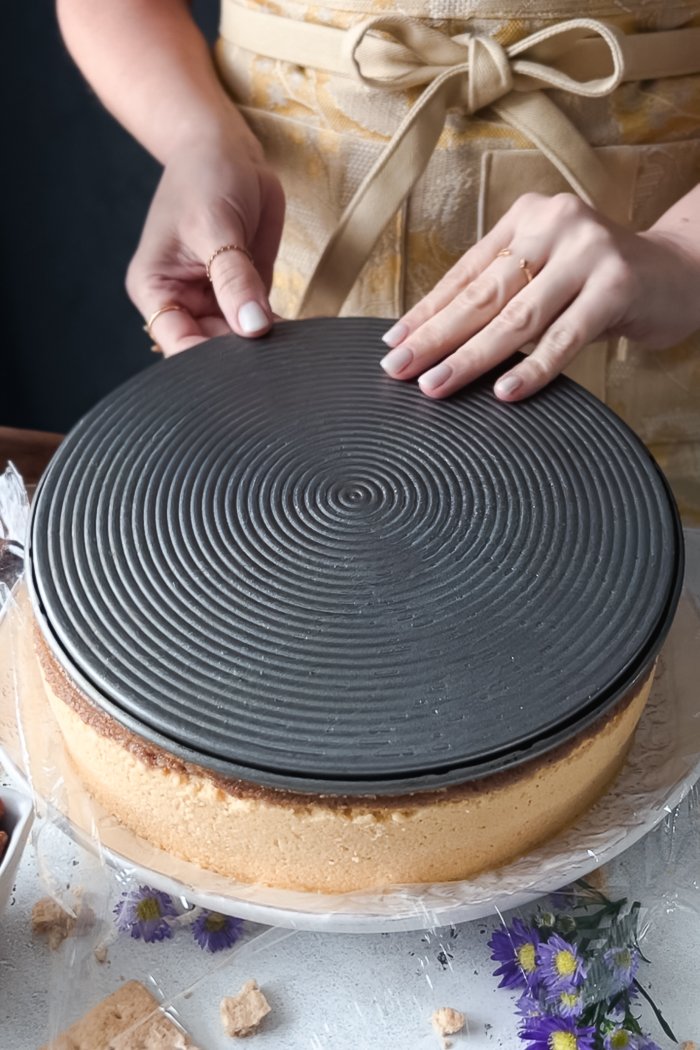
How to remove a cheesecake from the springform pan:
Removing a cheesecake from a a springform pan is pretty easy, pretty much as you would do with a cake but placing a cling paper on top before.
First, turn it upside down over a plate or large tray with a cling plastic paper in between.
Carefully remove the bottom of the pan and the parchment paper.
Place your serving plate on top and turn cheesecake once more. Remove the plastic paper.
Done!
Shop the post:
A 9” non-stick springform pan.
A sturdy large baking sheet. This one here is exactly mine.
Pre-cut parchment paper for the win. It makes life in the kitchen way easier.
3 recipes I think you’ll love if you’re loving this one:
Super Creamy Espresso Cheesecake
Mini Olive Oil Carrot Cakes with Creamy Cream Cheese Frosting
Classic Easy Tiramisu with Brownie Crust
*
This recipe is such a classic recipe for the holiday season and I know for sure it’s going to be a classic in your book. Take the first bite and send me a message. Or better yet, send me a slice!
Don’t forget to share and tag me in Instagram (@devamadeo), Facebook (@DevAmadeo) when you make it. Love to see my recipes in your kitchens!
(Remember to leave your email when you make a comment to receive a notification as soon as I get back to you. Don’t worry, this will not add your email to my email list.)


Creamy Pumpkin Cheesecake with Salted Caramel and Brown Butter Pecan Crust
Ingredients
Brown Butter Pecan Crust
◯ Unsalted butter - 10 TBSP (1 ¼ stick), 142g
◯ Pecans (optional) - ½ cup, 53g
◯ Traditional graham crackers - 8 oz (15 whole rectangular cookies)
◯ Natural granulated sugar - 3 ½ TBSP, 39g
Pumpkin Cheesecake
◯ Cream cheese, at room temperature (see notes) - 5 (8 oz) bricks, 1130g total
◯ Natural granulated sugar - 1 ½ cup, 305g
◯ Brown sugar - ¼ cup, 50g
◯ Freshly squeezed lemon juice - 2 TBSP, 27g
◯ Nutmeg - ⅛ teaspoon
◯ Pumpkin purée, canned - 1 cup, 200g
◯ Vanilla extract - 2 Tsps, 9g
◯ Coconut extract (optional) - ¼ Tsp
◯ Pure full fat coconut milk, (canned) - ¼ cup, 65g
◯ Unbleached all-purpose flour - 2 TBSP, 15g
◯ Eggs, at room temperature - 5, large
◯ Egg yolks, at room temperature – 2, from large eggs
Salted Caramel:
◯ White sugar - 1 cup, 200g
◯ Water - ¼ cup, 59g
◯ Butter (you may use salted) - 6 TBSP, 86g
◯ Heavy cream - ½ cup, 120g
◯ Fine sea salt - 1 to 2 teaspoons, 5g to 10g
Whipped Cream:
◯ Heavy cream - 1 cup, 240g
◯ Confectioner’s sugar - ½ cup, 50g
Details
Yield:
a 9” cheesecake, 14 to 16 slices
Total time:
2 hours plus chilling time in the fridge, minimum 8 to 10 hours
Active time:
15 minutes for making the crust, 20 minutes for making the cheesecake batter
Baking time:
6 minutes for the crust, 1 hour 20 minutes for the cheesecake
Equipment:
9” springform pan, parchment paper, baking sheet, aluminum foil and roasting bags (links above)
Steps:
Preparing the springform pan:
First line the bottom with a round piece of parchment paper.
Next (you may do this after baking the crust as well), wrap with aluminum foil the sides of the pan, pressing it well all the way around. If using a narrower foil, use 2 to 3 pieces to make sure all the corners are well covered.
Place pan inside a baking bag (they're sold mostly for turkeys), making sure there are no creases at the bottom. Using small binder clips, secure the bag on different sides. The bag should shallowly touch all the edges of the pan.
Making the brown butter pecan crust:
Preheat oven to 350°.
Place about 6 tablespoons of the 10 tablespoons/142g of butter in a small saucepan and heat over medium heat. After the butter has melted it will start to create a foam. Start swirling the pan almost constantly. When the foam collapses (this can take 5 to 8 minutes) cook for 1 to 3 minutes more, until the butter starts looking deep golden brown and smells buttery and nutty. Retire from heat and add the remaining butter. Swirl until melted and let it cool.
Toast pecans on a small skillet over medium-high heat for 5 to 7 minutes, until they are pretty fragrant and barely start looking brownish. Let them cool for a couple of minutes.
Place pecans in the bowl of a food processor and pulse until they are roughly grounded. Incorporate the graham crackers, snapped in pieces and the 3 ½ tablespoons/43g of sugar. Pulse until crumbs are sandy.
Stir the brown butter with a spoon to make sure it’s well incorporated. With the processor running pour it through the lid opening until the crumbs look fine and well hydrated, about 10 to 15 seconds. Stop the processor and pull down any crumbs crawling up the walls of the bowl if necessary and pulse a few seconds more. (Alternatively, transfer dry crumbs to the pan and pour melted butter over them. Mix butter well until crumbs have absorbed all of it.)
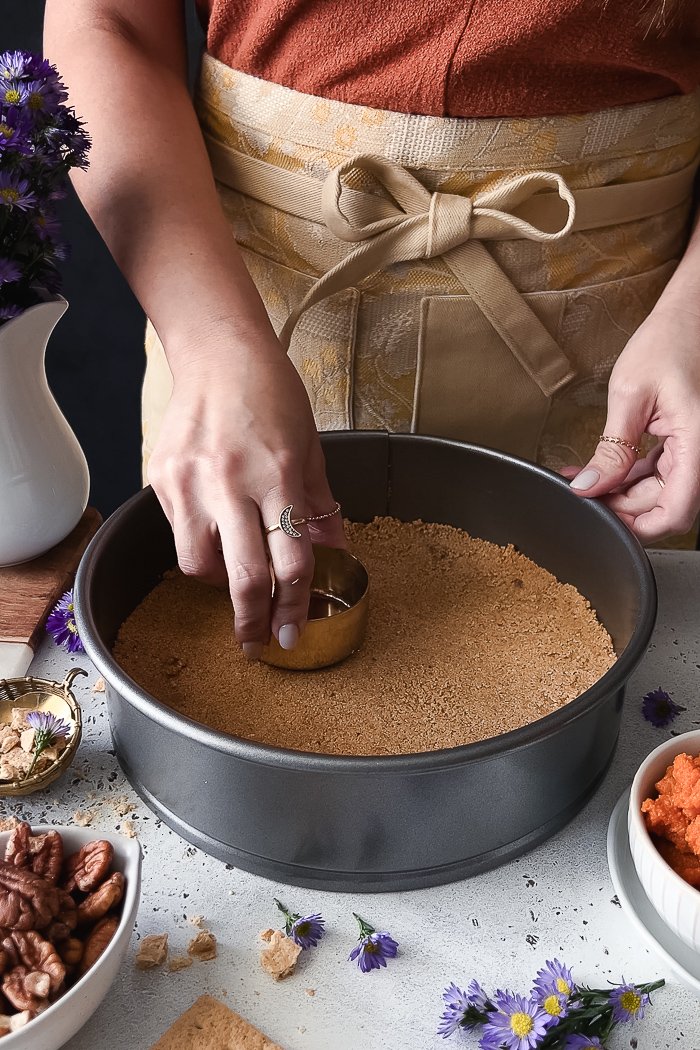
Transfer crumbs to a 9” springform pan or a 9” pie dish. Press crumbs tightly towards the bottom until the surface is flat. Press the edges well. You may use a small flat bottom measuring cup or utensil to help you press tightly. Bake for 6 minutes. Take it out of the oven to let it cool down.
Increase oven temperature to 425° and place a baking sheet in the middle. Fill it with water a bit more than half way.
Making the cream cheese filling:
Place the cream cheese in the bowl of a stand mixer with the wire (whisk) attachment (if using a hand mixer use the beaters). Beat on medium-low speed (#2 in the stand mixer) until cream cheese is smooth and creamy with no large lumps, about 2 minutes. Stop the mixer and scrape down the sides and bottom of the bowl with a silicone spatula to make sure there are no big lumps of unbeaten cream cheese. Beat an additional minute. Scrape one more time if necessary.
(Scraping the sides and bottom of the bowl several times throughout the process to ensure there are no lumps of cheese is key to making the mixture smooth and bubble-free.)
Slow down to minimum speed and gradually add the 1 ½ cup/305g of sugar, the ¼ cup/50g of brown sugar and the 2 tablespoons/27g of lemon juice. Mix 1 minute. Add the 2 teaspoons/9g of vanilla and the ⅛ teaspoon of nutmeg and mix until incorporated. Add the cup/200g of pumpkin and mix until well incorporated. Add the ¼ cup of coconut milk and mix.
Stop mixer and scrape the walls and bottom of the bowl once more and mix to reincorporate everything. Add the 2 tablespoons/15g of flour just until incorporated. One at a time, add the eggs and egg yolks (wait until the yolk breaks to add the next one). Stop beating as soon as the last yolk is incorporated. Scrape the sides and bottom of the bowl once more. Beat for an additional 30 seconds to one minute. Pour the cream cheese filling over the crust.
Make sure oven is at 425°.
Very carefully (be careful when you open the oven door because hot steam will come out) place the pan in the baking sheet filled with water. Bake for exactly 7 minutes. Decrease temperature to 275° and bake for 1 hour and 10 or 15 minutes, until the top looks dry, the border look set but the center is somewhat jiggly.
Turn oven off and let the cheesecake inside with the door half way open. After 5 minutes you may open the door completely and let the cheesecake there for 15 to 20 minutes. Take it out and let it cool down completely in a dry warm area, a few hours
Cover the cheesecake tightly with plastic seal or aluminum foil (not touching the cheesecake). Chill in the fridge overnight.
Remember that this cheesecake can be made a few days in advance and I highly recommend it. The texture and flavor are at their best after 3 to 4 days after baked.
Remove cheesecake from springform pan and pour salted caramel sauce. Top it with silky whipped cream.
Making the salted caramel:
In a small and wide stainless steel heavy bottom sauce pan (do not use non-stick) place the sugar and water. Have a pastry brush with water around and use it to push down any granule that stays stick to the pan wall to prevent crystallization.
Heat over medium heat. With a wooden spoon or spatula gently stir a few times to make sure sugar is well distributed. Do not stir after the sugar has dissolved and start to bubble.
Keep boiling util the sugar has turned deep golden/amber brown, swirling the pan occasionally. This can take 6 to 8 minutes. At this point add the butter and whisk with a hand whisk. It will look separated at first but keep whisking until it look homogenous. This can take about 5 minutes.
As soon as butter has incorporated completely pour the heavy cream in a thin stream. Be careful because the mixture will bubble rapidly and rise up. If you feel it’s a bit out of control, remove from heat and keep whisking until is more manageable. Return to heat and let it boil for 1 minutes without whisking or swirling. Remove from heat and add the salt, gently swirling with a spoon to mix.
Let it cool 2 to 3 minutes before pouring over cheesecake or let it cool down about 20 to 30 minutes before pouring on glass containers to store in the fridge.
Making the whipped cream:
Put your mixing bowl and whisk to chill in the fridge for 15 minutes. You may serve the ½ cup/120g of and put apart to chill as well.
Sift the ½ cup/50g of confectioner’s sugar.
Pour heavy cream in the mixing bowl and mix in the medium speed (#3 in the KA), until it starts looking thick and soft peak forms (you should see very shallow indentations on the cream).
Gradually add the sugar. Keep mixing until the indentations look deeper and a firm peak stays up when you lift the whisk. Serve immediately.
