Nutella Chocolate Blossom Cookies


Unexpected Treasures
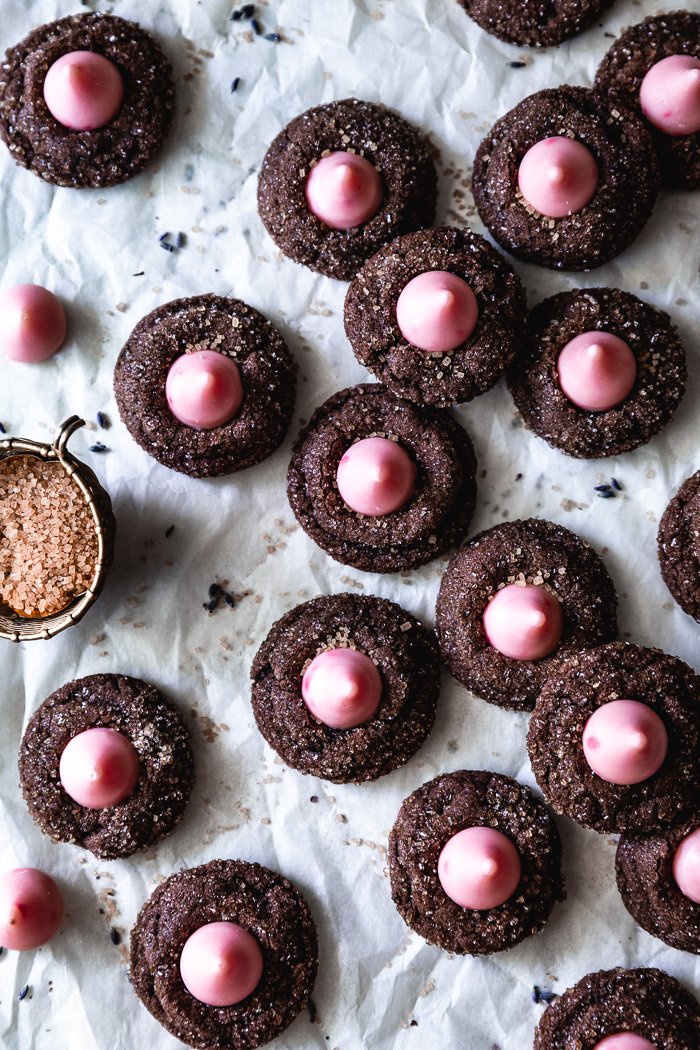
These chewy and chocolaty strawberry Nutella blossoms are incredibly cute and impossible to resist. They’re soft and pillowy with a sugary chewy bite. Completely made with basic pantry ingredients, because I truly hope that by now everyone considers Nutella a very basic pantry item! Dough is made in no time and you can bake the whole batch at once or just bake the ones you are planning on eating. These are the perfect everyday cookie in my book!
You know I’m not a big fan of sugary and artificially colored anything. But these strawberry kisses made their way into my sight and definitely caught my attention. Between confusion, curiosity and grossing out, I was in the drug store aisle trying to decide how I felt about them. And I really needed to hurry because my husband was about to pay! With the pressure, I decided curiosity was the way to go, and let my mind wonder about what to create with those never-seen-before chocolate candies. The answer was chocolate cookie blossoms. Strawberries and chocolate go so well together after all!
These chocolate Nutella blossoms are based on my classic peanut butter blossom cookies. The perfect shape of cookie to let that fun strawberry kiss shine out. These cookie blossoms have no peanut butter. I used Nutella instead and added a tablespoon of unsweetened cocoa powder to the dough to intensify that chocolate flavor. I decided this on the go so if you don’t have unsweetened cocoa powder available (natural or Dutch process) you can leave it out completely.
You can use any kiss flavor you want of course, but this strawberry thing was very fun. Some told me they were having strawberry Quick vibes in a very good way. I ate some with the strawberry kiss but ate others plain. This recipe is perfect to make without any chocolate candy on top, just a chewy, soft and pillowy sugar coated Nutella cookie!
With traditional cookies blossoms, you are instructed to press down the kiss on the cookie as fast as you take them out of the oven. If you are using these strawberry kisses though, we are going to do things differently to prevent the kiss from melting completely, like it happened to me in the first round. Instead of leaving cookies to cool down in the baking tray and press kisses almost immediately, you are going to transfer cookies to the cooling rack and let them cool down for 3 minutes exactly before pressing on the strawberry kisses. First batch was still super delicious, but had a pink pool in the middle instead of a pretty kiss, haha! My theory is that since these candies are made with white chocolate plus have cream as well, the melting point is way lower than regular chocolate candies. The more you know!
Let me share with you a rundown on how I made these chocolate Nutella blossom cookies.
How to make Nutella chocolate blossom cookies:
Start by making up space in the freezer for a baking tray and preparing one or two baking trays with parchment paper or a silicon mat. Next mix unbleached flour, baking soda and salt in one bowl and beat butter, sugars, egg, Nutella, vanilla and cocoa powder in a second large bowl. You can use a stand mixer or an electric hand mixer.
The best of both worlds: I used both natural granulated sugar and dark brown sugar. If you don’t have dark brown sugar use light brown sugar only for a total of 1 cup. Do not use granulated sugar only because they won’t end up chewy.
To keep these cookies bite size, you need to measure a scant tablespoon of dough (the ideal measurement is ¾ tablespoon) and then shape it like a ball as rounded as you can. I used a measuring tablespoon to serve the dough. The dough balls should measure 1”. If they measure more than that they will end up a bit bigger than what we are looking for here. Of course, nothing happens if you are eye balling and they are a bit bigger! This is just a tip if you want more bite size cookies. But once you make a few you’ll see you’ll measure everything automatically.
Time to roll: You have to use a coarse sugar for coating like decorator’s sugar, demerara or turbinado for that crunchy sugary texture. If you don’t have any on hand, use your regular granulated sugar. The texture won’t be as crunchy but they will still be delicious!
How to prevent chocolate blossom cookies from spreading and getting flat: work with barely softened, not warm ingredients. This detail plus freezing the rolled and sugar coated cookie dough balls 25 to 30 minutes are both key in preventing cookies from spreading and ending flat. You don’t want a flat cookie with a kiss on top, you want that the cookie looks like it’s hugging the kiss, creating that particular blossom shape we love!
While the cookies are freezing, unwrap candies and place them in the fridge so they are chilled when placed on the baked cookie, another tip to prevent melting. Bonus point if you have the time to make this step ahead. The more time in the fridge the better.
Baking time: bake for 8 minutes for a perfect chewy exterior and soft interior.
Putting a kiss on it: as mentioned earlier, if using the strawberry kisses, transfer cookies to a cooling rack as soon as they are out of the oven and wait exactly three minutes before pressing the strawberry kiss on. Let them cool down completely in front of a cool air draft or fan. Now they are ready to be eaten!
So, do you think you will be taking the leap with me with these strawberry kisses? I hope you do because these ended up pretty cool. But hey, nothing beats the classic chocolate on chocolate as well! I know you would love these anyway you make them!
(Remember to leave your email when you make a comment to receive a notification as soon as I get back to you. Don’t worry, this will not add your email to my email list.)


Nutella Chocolate Blossom Cookies
Ingredients
◯ Decorator’s granulated sugar, demerara or turbinado or natural granulated sugar extra to coat the cookies - about 1 cup for the whole batch
◯ Unbleached all-purpose flour - 1 ½ cups (240g)
◯ Baking soda - ¾ Tsp
◯ Fine sea salt - ¼ Tsp
◯ Unsalted butter, softened - ½ cup (8 TBSP)
◯ Natural granulated sugar - ½ cup (114g)
◯ Dark brown sugar - ½ cup (102g)
◯ Egg, large - 1
◯ Chocolate hazelnut spread (such as Nutella) - ½ cup
◯ Vanilla extract - ½ Tsp
◯ Cocoa powder - 1 TBSP
◯ Strawberry kisses (or your favorite kisses) - about 40 or the amount of the cookies you are planning on baking.
Details
Yield:
about 40 cookies
Total time:
1 hour
Prep time:
10 minutes making the dough and 10 minutes for coating the cookie balls with sugar
Freezing time:
25 to 30 minutes
Baking time:
8 minutes
Equipment:
stand mixer or electric hand mixer, large bowls, baking tray and parchment paper or silicon mat, cooling rack
Steps
Make sure you have space in your freezer for a baking sheet. Line two with parchment papers (if you only have one line it and place a parchment paper over anything you can use as a tray, plate or shallow pan to fit in the freezer, like a large lasagna pan). You may use a silicon mat as well.
In a large plate or shallow bowl serve the sugar you will be using for coating.
In a bowl whisk together the 1 ½ cups of flour, the ¾ teaspoon of baking soda and the ¼ teaspoon of salt.
With a stand mixer or an electric hand mixer beat butter for one minute to make it smooth in medium-low speed (#2 in the Kitchen Aid). Add the ½ cup of granulated sugar, the ½ cup of dark brown sugar, the egg and the ½ cup of Nutella, the teaspoon of vanilla extract and the tablespoon of cocoa powder. Beat in medium speed (#4 in the Kitchen Aid) until a blended paste forms, about 3 minutes. Dump the flour mixture and mix until a dough forms, about less than a minute.
Measure a scant tablespoon of dough, ¾ tablespoons would be the ideal measurement. Roll it into a 1” ball (see notes above). Pass it through the coating sugar, making sure all sides are covered. Place it where you are going to freeze the cookies. Repeat with the rest of the dough. You can roll over the sugar 3 to 4 cookies at the same time. Freeze for about 25 to 30 minutes (cookie dough can stay in the freezer for longer if needed).
Preheat oven to 375°.
While cookie dough freezes, unwrap strawberry kisses (or the ones you are using) and place them if the fridge, if you haven’t made this step already.
When ready to bake, arrange cookie dough balls in your baking sheet with 1 ¾” to 2” apart from each other and from the tray edges. I used an 12” x 17” sheet and could arrange 4 rows of 4 cookie dough balls. Bake for 8 minutes, until they have spread almost completely but still have a bit of a bump.
Take cookies out and carefully transfer each cookie to a cooling rack (ideally in front of a cool air draft) using a thin spatula (I always use my fish spatula for cookies). Let them cool down for exactly 3 minutes, then press the strawberry kisses in the middle. Let them cool down completely.
If you are not making the whole batch of dough you can transfer frozen cookie dough balls to a plastic freezer bag (I like to make them double) and store in the freezer a few months. No need to thaw, just bake for 2 extra minutes (make a test with 1 or 2 balls first to test baking time).
