Thanksgiving Menu 2019
I wasn’t planning on making a Thanksgiving menu for the blog to tell you the truth. But the other day, leaning towards my car while I was pumping up gas, I got thinking about how many blessings I have gotten this year. All my life to be fair, but this year has been pretty special and amazing. I realized then that the best thing I could do was to share with you guys how grateful I am by celebrating the perfect holiday to do just that. So here’s my take of an impromptu but still delicious Thanksgiving menu.
Every recipe is super simple and I wrote some notes on each of them so you can refer directly to that section when making them.
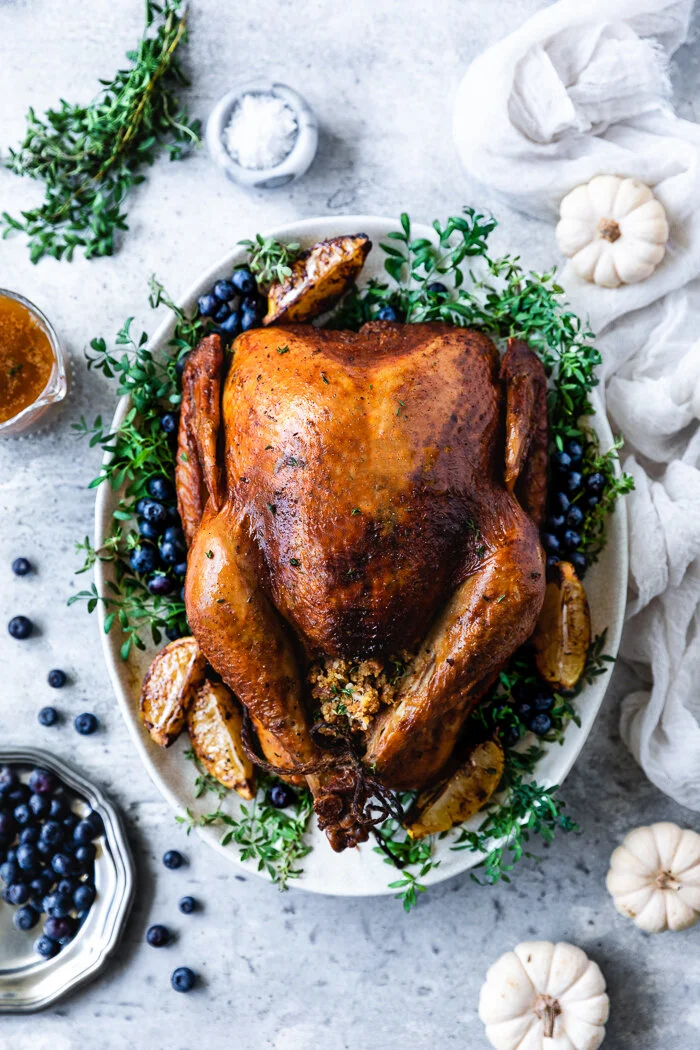
First, I have seen the trend of splitting or slicing the turkey before roasting it and let me tell you, me not like it. At all! I like my turkey whole and perky when placed on the table. I get the idea is to make sure it is well cooked and still juicy, but I have always achieved a juicy, tender and fully cooked turkey with my technique of dry brining and roasting at a 425° oven but for less amount of time than traditional recipes. I also never brine my turkey because a) I don’t have space on my fridge for a ginormous bowl full of water with raw turkey juices swimming around and b) I don’t need the whole watery mess, thank you very much. Trust me, if you use the amount of seasoning, oil and butter I’m sharing here and you do it two days in advance, you will have the juiciest and most tender bird ever. But it’s important your turkey is completely thawed before seasoning. This is key in any recipe.
For this year I used a mix of herbs de provence so I didn't have to be mixing different herbs and spices. One jar and I’m good to go! And no matter how I play with the seasonings every year, I always use paprika for that reddish golden color, olive oil for moistness and herbed butter under the skin for self-basting.
For the stuffing, I like to cook it inside the turkey. Common, it’s called stuffing for a reason! And this one always ends up flavorful and juicy, trust me! I love this combination of corn bread with queso manchego and something salty like bacon or, for this year, pancetta. This year I made my own corn bread and used olive oil to add an earthier flavor to this rich and herby menu.
The cranberry sauce is pretty straightforward, mainly because every time I make a generous amount of a super creative cranberry sauce, it ends up sitting on the fridge because is not that popular around here. I decided to make something super simple in about 30 minutes. Still, since I added a splash of port wine, it is the perfect topping for that juicy turkey.
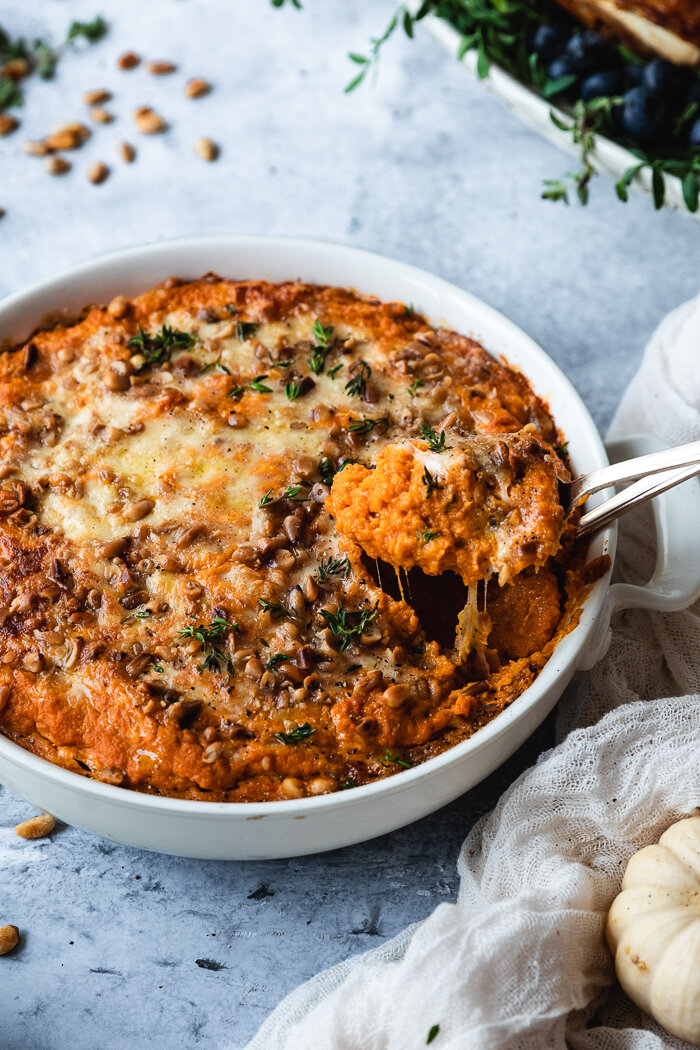
The pumpkin casserole is a fun one! Sweet and cheesy at the same time and why not. It’s Thanksgiving and lots of crazy flavors are allowed, amirite? I used fontina and burrata cheese and topped everything with some toasted pine nuts for some added crunch.
To add some green and freshness to this menu I made this Brussel sprouts salad with baby pickled red onions. You can make the pickled onions way in advance and I decided to sauté the sprouts because lets face it, your oven will be super crowded that day. I made a grainy mustard dressing using some of the oil of the sprouts and the vinegar of the pickled onions. The flavors of this salad are a bomb!!
Dessert is baking up in the blog oven and its coming up very soon. A little teaser? It's a Lemon Cinnamon Curd Cheesecake with a Turrón Crust and an Italian Meringue crown!!
UPDATE!! Dessert is UP now! Lemon Cinnamon Cheesecake with Almond Turrón Curst and Italian Meringue is right here!
My time table
1. Four days before:
a. Made the Olive Oil Sweet Corn Bread.
b. Made the pickled onions and cranberry sauce.
c. Checked if turkey was thawed and because it wasn’t, I covered it with some salt and lemon juice (refer to full recipe below for more details on this step).
2. Three days before: Seasoned the turkey (it should be resting seasoned for two full days +).
3. Two days before: Made the cheesecake, except for the meringue.
4. The day before:
a. Made the pumpkin casserole.
b. Made the stuffing.
5. The same day:
a. Made the meringue and finished the cheesecake first thing in the day.
b. Took the turkey out of the fridge about an hour before roasting.
c. Made the Brussels spouts salad while the turkey was roasting.
d. Baked the pumpkin cassoulet while the turkey was resting and cooling down.
e. Made the gravy during the last 15 minutes of the pumpkin baking time.
Have a happy, wonderful and blessed Thanksgiving day my dear friends!
Thanksgiving Menu Recipes
Olive Oil Sweet Corn Bread, Queso Manchego and Pancetta Stuffing
To make the Olive Oil Sweet Corn Bread:
Recipe Notes:
1. If you don't have a 9” x 3” round cake pan you can use a 9” x 13” rectangular cake pan or two 8” round cake pans.
2. Place your pan on a baking sheet to catch any batter spills.
3. You can make this sweet corn bread 3 to 4 days in advance; just store it in a cool dry place until ready to use. And you can crumble it since day one, making it easier to store.
All-purpose unbleached flour – 1 ½ cup
Corn flour or meal – 1 cup
Raw sugar – 1 ½ cup
Baking Powder – 2 Tsp
Fine sea salt – 1 Tsp
Eggs – 3
Buttermilk – ½ cup
Olive oil – 1 cup
Preheat oven to 350°. Grease or spray baking spray on a 9” x 3” round cake pan (see notes).
In a large bowl combine flour, corn flour, sugar, baking powder and salt and whisk with a hand whisk.
In another bowl mix well the eggs, buttermilk and oil until the mixture emulsifies.
Make a well in the center of the dry ingredients and pour the egg mixture. Using a wooden spoon mix everything together, making sure there are no visible flour streaks. The batter should be thick.
Transfer to prepared pan and bake for 30 minutes or until a toothpick comes out dry when inserted through the center of the cake. Retire form oven and let it cool for 5 minutes before removing from pan.
Store in a sealed large plastic bag or in a cool dry place until ready to make the stuffing.
To make the stuffing:
I’ve been doing this stuffing for years with store bought sweet corn bread. This year though, I decided to make my own sweet corn bread. Since this recipe is particularly for the stuffing, I decided to make it with olive oil for a richer texture and flavor. You can make your own or buy a good homemade corn bread, the kind you’ll find in your local bakery or specialty foods shop. Either way it’s going to be so delicious!
1. You can make the stuffing two days in advance.
2. Also, you may swap pancetta for bacon or even thick prosciutto.
Diced pancetta – 8 oz
Corn bread, slightly crumbled – ¾ to 1 full baked corn bread, or 4 cups
Olive oil – 3 TBSP
Good pinch of fine sea salt
Sprinkle of freshly ground black pepper
Squeeze of half lemon
Queso Manchego, grated – 1 cup
In a stainless steel skillet heat the olive oil over medium heat. Add the pancetta pieces and sauté for 3 to 4 minutes, until the pancetta looks crispy. Add the crumbled corn bread, the pinch of salt and a good sprinkle of freshly ground black pepper and combine with the pancetta. Squeeze a bit of lemon juice over the cornbread, about half lemon or to taste. Retire from the heat and mix in the manchego cheese, crumbling as much as possible the cornbread in the process.
Use this mixture to stuff your turkey.

The Easiest Port Wine Cranberry Sauce
Raw sugar – 1 cup
Water – ½ cup
Freshly squeezed lemon juice – ½ TBSP, about a splash of half lemon
Fresh cranberries – 12 oz
Port Wine – ½ cup
Pinch of fine sea salt
Not gonna lie, this cranberry sauce is here just to make the statement that my menu has a cranberry sauce. My family is not crazy about it. They can take just a spoon of it to taste it, but it has never been the star of the show. That’s why I made this super simple, uncomplicated cranberry sauce. I always like to add a twist, so for this time I added a splash of Port wine to make this sauce a bit more fun.
Recipe notes:
1. You only need 5 ingredients, 30 minutes and you can certainly make this a few days in advance.
2. This sauce has a consistency of a thin fruit preserve. For a thicker sauce use ¼ cup less of liquid.
3. If you don't want to use port wine use water instead and start cooking with the whole amount of liquid.
To make the cranberry sauce: In a medium saucepan combine the sugar, water and lemon juice. Bring to a boil over medium high heat until the sugar has dissolved. Add the cranberries, mix and lower the temperature to medium. Cook for about 20 to 25 minutes, until the sauce has thickened and the cranberries start to pop. Retire from heat and add the port and the salt. Mix and let it cool completely before storing in the fridge at least 6 to 8 hours. Let it loose the chill for 15 minutes before serving.

Pumpkin and cheese cassoulet
Pine nuts – about 3 TBSP
Pumpkin puree – 3-15 oz can
Eggs – 2
Fontina cheese, coarsely grated – ½ cup +2 TBSP
Burrata – 4 oz
Raw sugar – ¼ cup
Cinnamon – ½ Tsp
Grated nutmeg – ¼ Tsp
Freshly squeezed lemon juice – 1 TBSP
Unbleached all-purpose flour – 3 TBSP
Pinch of salt
Some butter to grease the bottom of your casserole
Think of this as what would happen if a pumpkin pie decided to rebel up and get married with cheese. It’s warm, sweet and super, duper cheesy.
1. Pine nuts are so creamy that they go so well here, but almonds or pecans have to be delicious as well.
2. This would be better made the day before serving. Just cover with plastic or wrap paper to store in the fridge.
If baking at the moment, preheat oven to 400°.
Place pine nuts in a large skillet and heat over medium high heat. As soon as the skillet starts to heat, shake the nuts or keep tossing them until slightly toasted and golden brown, about 5 minutes. Retire from heat and remove pine nuts for skillet. Set aside.
Use some butter to grease the bottom of a medium shallow oven-proof bowl or casserole.
In a large bowl mix the pumpkin puree and eggs until there are no streaks from the eggs. Mix in ½ cup of fontina, burrata, sugar, cinnamon and nutmeg. Add flour and salt and mix until there are no streaks of flour. Pour mixture in your prepared pan.
Roughly chop the pine nuts and mix with the remaining 2 tablespoons of fontina. Spread through the top of the pumpkin mixture. Bake for 40 minutes, until cheese on top has melted. Let it cool for 10 minutes before serving.
If baking later, cover your pan with plastic paper and store in the fridge. Bake for 3 to 5 extra minutes.

Brussels Sprouts Salad with Pickled Onions and Grainy Mustard Dressing
Pickled Onions
White wine vinegar – ¾ cup
Raw sugar – ½ cup
Fine sea salt – 2 ¼ Tsp
Firm baby red onions, peeled and halved – 8 to 10 oz
Brussels Sprouts
Raw Brussels sprouts, peeled and halved – 16 oz, about 4 cups
Fine sea salt – 2 TBSP + ¼ Tsp
Raw sugar – 1 TBSP
Olive oil – 3 TBSP
Good sprinkle of freshly ground black pepper
Freshly squeezed lemon juice – splash of half lemon
Pinch or two of red chili flakes
Grainy Mustard Dressing
Olive oil – 1 ½ TBSP (use any oil left from the Brussels sprouts here and complete with fresh olive oil to reach the needed amount)
Vinegar from the pickled onions – 2 TBSP
Ground garlic – ¼ Tsp
Small pinch of salt
So, I’m not a fan of Brussels sprouts. Probably you aren’t either. I started cooking them for my daughter because they are extremely nutritious, but that was that. After I started the blog, I wanted to give them a try for Thanksgiving. That’s when I made my first Brussels Sprouts recipe, Roasted Brussel Sprouts with Pepitas and Proscuitto and it was so good. A few around here were converted! For this menu I wanted to make an easier to put together salad with no oven involved, that's why I sautéed them instead of roasting to give the poor oven a break, and made it sweeter and fresh with the addition of pickled onions.
Recipe Notes:
1. Make the pickled onions in advance. You can even make the dressing in advance too (after the onions have pickled because you will need some of its liquid). But this salad would be best if you cook the Brussels sprouts and put everything together the same day. You can make it a few hours in advance though.
To make the pickled onions: In a glass jar or large bowl with lid, combine vinegar, sugar and salt and mix until the sugar has dissolved completely. Incorporate the onions and shake for a few seconds. Let them soak for a few hours. You can make this a couple of weeks in advance.
To make the Brussels sprouts: Cover the already peeled halves of Brussels sprouts with water and mix the 2 tablespoons of salt and the tablespoon of sugar until both are dissolved. Place in the fridge and let them chill for a few hours.
Drain and pat dry the sprouts.
In a large skillet heat the 3 tablespoons of olive oil over medium-high heat. Sprinkle over the ¼ teaspoon of salt, pepper and lemon juice. Toss them frequently for about four minutes, until the sprouts outer layer looks soft and tender but they still hold its shape and the leaves are still in place. Sprinkle the chili flakes during the last minute of cooking. Retire from heat and wait a few minutes to let them cool down.
In a medium bowl mix them with the pickled onions. Drizzle dressing (recipe follows) and toss one more time before serving.
To make the Grainy Mustard Dressing: Mix all the ingredients well. Drizzle over salad.


Herbs de Provence Roasted Turkey (no brining and in less than two hours)
The Turkey
Whole turkey – a 14 to 16 lb turkey
Fine sea salt – 4 to 5 TBSP
Ground paprika – 1 ½ TBSP
Ground garlic – ½ TBSP
Herbs de provence – 1 ½ TBSP
Extra virgin olive oil – ½ cup
For the day of roasting
Stuffing (recipe above)
1 lemon cut in four wedges
Butter, softened – 5 TBSP
Fresh rosemary, finely chopped – 1 ½ TBSP
Fresh thyme leaves – 1 ½ TBSP
Turkey Gravy
Turkey or chicken broth – ¾ cup
Water – ¾ cup
Fresh thyme sprigs – 3
Juices of the pan
Pinch of salt
Cornstarch – 2 TBSP diluted in a bit of water
This is the star of the show!! Get ready to invest about 1 hour and 45 minutes for seasoning your bird, including time to let it dry before properly wrapping and storing. Also, be ready to improvise during roasting time. No matter how simple or fool-proof a recipe can be, every turkey prep and oven is different, treat the recipe as accurate guidelines, but you’ll need to supervise the process and in the case given, make adjustments on the road. Have your mini oven mitts lined with silicon, aluminum foil and turkey thongs, if using, readily available. Let’s get roasting!
Recipe notes:
1. If buying a frozen turkey, try to buy it the day before seasoning and leave it outside the fridge covered in water. If buying about two days ahead of this, leave it in the fridge and the day before make the water bath. If it is still frozen when you open it, sprinkle some salt and drizzle some lemon juice on both sides of the turkey. Wrap it and store it in the fridge or leave it outside if you are trying to season it during the next few hours. If you need to do this, decrease ½ tablespoon of the salt from the recipe.
2. When the turkey is completely thawed, pat it dry and let it dry outside for about an hour before seasoning.
3. This recipe works better with a small turkey, 14 to 15 lbs. For a 16 to 17 lbs. bird, you should consider lowering the oven temperature to 400° after the first 30 to 40 minutes of roasting and add 10 minutes more of cooking per side. Always check your turkey during the last 10 minutes of roasting to see if you need to cover it, which you probably have to. This technique would not be as effective on a turkey of 18 pounds or larger.
To make the turkey: Start with your turkey completely thawed and pat dried (see notes on how to prepare the turkey). Prepare a bed of paper towel over a baking tray or flat surface to place your bird breast side up. Leave a clear space on the side to transfer the turkey when it’s time to turn it over.
You’ll use about half of the salt on this side. Gently rub the whole upside of the turkey with some salt. Make sure to also rub with more salt the wall of the turkey’s cavity. Gently and careful not to tear the skin, start to pull up the breast area using your fingers to detach the skin from the meat. Rub some salt directly on the breast’s meat. Try the same under the skin between the edge of the breast and the leg, and try to reach the leg’s meat as well. Keep working any area you can reach beneath the skin and every now and then return to keep working on reaching upward the breast meat. Also work the leg bone and any fatty area. The juices that those areas will render are going to get mixed with all the seasonings and those are the juices that are going to travel around the turkey, keeping it moist and flavorful.
It will become easier to release the skin from the breast and top leg area because the meat will start to release moisture and relax because of the salt, so if you keep coming back to that area after each layer of seasoning you will be able to reach upward more and more, always being careful not to tear it up. Also because of this, you’ll keep finding spots between the skin and the meat where you can reach with seasoning.
From there, use half of the paprika to rub all the upside of the turkey and reachable areas beneath the skin. Rub half of the crushed garlic as well. Gently pat and softly rub half of the herbs de provence (you want to spread the herbs more with a pat motion so the dried herbs don't tear the skin). Drizzle half of the olive oil through the surface of the turkey and kind of press it toward the bird.
Prepare a bed of plastic wrap paper behind (see notes on how to make this). Take the turkey and turn it upside down on the plastic papers. Pat dry that side of the turkey again and repeat all the previous process with the remaining salt, paprika, garlic, herbs de provence and olive oil. Remember to work the cavity and, even though you can’t separate the skin from the back, look for areas that you can reach and bring salt and seasonings. End by drizzling the remaining olive oil.
Tightly wrap the turkey with the plastic paper. Here you can place the turkey in a tight turkey plastic bag or use more long plastic paper pieces to keep wrapping the turkey until it is completely wrapped and secure (I used the second method).
Place the turkey in your fridge, ideally in your coldest drawer, for two days.
When T day comes, take your turkey out of the fridge and let it sit for about 45 minutes before roasting.
Position rack in the lowest tier and preheat oven to 425°.
(Optional: Cut the lemon in four wedges and rub it with salt and a bit of sugar. Heat some olive oil in a stainless steel skillet and sauté each wedge on each side until caramelized and the borders are a bit charred. Use these lemons as part of your stuffing.)
When ready to put it in the oven, unwrap it and transfer it to your roasting pan or rack, breast side up. Put two lemon wedges on the sides of the turkey’s cavity. Stuff as much as you can the cavity with the stuffing. Insert the remaining two lemon wedges if you have space. Tie the bottoms of the turkey legs and bend and hide the wings beneath the turkey breast. Use a piece of bread or root vegetable to give the turkey stability and keep it straight.
Place turkey in the oven and roast for 45 minutes, 50 to 55 minutes for a 16+ pounds turkey (see notes above). Check during the last 5 to 10 minutes to see if the skin is already too deep brown and if that’s the case, pull out the turkey without taking it out of the oven and being careful not to get burn tent the top with aluminum foil.
After that, take out the turkey and position rack on the second tier from the bottom up. With a a pastry brush, brush some of the drippings through the upside skin. Wait about two minutes and carefully making sure you don't tear the skin, turn the turkey upside down. You can either turn it from the sides or pull the legs up and from there lift the breast and quickly make the turn, which ever form you feel is more secure and comfortable for you. I did this with my own hand using mini oven mitts that are fully lined with silicone. Rearrange the pieces of bread to, again, keep the turkey straight.
Place turkey back in the oven and roast for 40 to 45 minutes, 50 to 55 minutes for a 16 pounds bird, checking during the last minutes to see if some aluminum cover is necessary.
Remove turkey from oven and let it rest for at least 45 minutes before carving.
To make the turkey gravy: Carefully and after the turkey roasting has cooled down a bit, transfer the turkey juices with as much scrapings as you can to a large stainless steel skillet. Add broth, water, thyme and salt and cook over medium-high heat for 5 minutes. Pass liquid through a sieve and return it to the skillet. Add cornstarch and cook whisking by hand for an extra minute, until it starts to thicken. Retire from heat and keep whisking for the next 30 seconds. Transfer to your serving bowl.